

How To Put The Bridge On A Violin
Iii top luthiers answers a reader's query on preserving the correct instrument geometry after changing strings, in this characteristic from 2014
The dilemma I always modify my strings ane at a fourth dimension, usually playing one in for ten minutes or so earlier changing another. Simply sometimes I detect, after a lot of retuning during the settling menses, that the angle of my bridge has changed. Is there any way I tin can foreclose this from happening? And when information technology does happen, what'due south the safest way to push it dorsum into the right position? (Too, how tin I tell that it is in exactly the right position?)
JERRY PASEWICZ
This is a common consequence. When changing your strings, accept a precipitous pencil and put a trivial graphite into the string groove for lubrication, both at the bridge and at the nut. After each string-change, cheque the bridge for straightness by looking at it from the bass side – it is the treble (soundpost) side that is more likely to be distorted. Your bridge is straight if its back is almost at a correct bending with the violin'southward top on the tailpiece side, and the very top of the bridge is fading slightly towards the fingerboard. If this is not the case, your bridge can be corrected with the following steps:
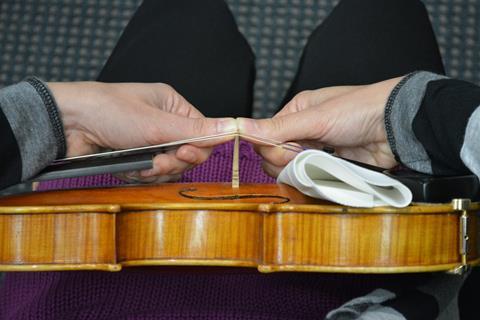
Concur the violin in your lap with a polishing textile nether the tailpiece, the cervix towards the left, and the bass side towards y'all. Place your correct-hand fingers under the tailpiece, with your thumb touching the bridge betwixt the A and D strings. Next, place your left-hand fingers under the fingerboard with your left pollex touching the bridge, contrary your right pollex, as well between the A and D strings (figure one, to a higher place).
With slight pressure level from pollex to thumb, gently motion the elevation of the bridge towards the tailpiece, keeping your correct thumb in place every bit a brace. Using this technique should allow yous to proceed your bridge straight.
It can also be useful to measure the distance from the cease of the fingerboard to the tiptop of the bridge, so yous can refer to it when adjusting the bridge in future. For greater accuracy yous can ask your luthier to brand a small reference stick for this measurement. It is possible to make a span that would never need to exist straightened, just information technology would not be something you lot would want to have on your musical instrument.
Jerry Pasewicz is a luthier based in Raleigh, NC, and the current chair of the Violin Gild of America's International Violin and Bow Makers Competition
NICOLAS GILLES
When new strings are settling downwards, retuning them multiple times will always crusade the bridge to move slightly in the direction of the fi ngerboard. It is a skilful idea to change one string at a time, as this will help prevent the soundpost from collapsing. In the start instance, the best advice would be to meet a violin maker to ensure that everything is all correct with the span, and to learn about the item needs of your musical instrument.
To pull dorsum the bridge, gently identify the palms of your hands on to both of the violin'southward lower corners, and catch the bridge betwixt your thumb and index finger on both sides of the span. And so pull dorsum the bridge in the direction of the tailpiece. The back of the bridge must exist perpendicular to the arching.The bridge should be centred in line with the fingerboard. Put the top of the scroll on your cheek and await down the fingerboard to bank check that the bridge is in line with information technology. In practice, putting a bridge back in place is not too difficult but information technology requires some intendance. A luthier will be happy to bear witness you how to treat your instrument with the intendance it deserves.
Nicolas Gilles is a luthier based in Montpellier, French republic
DAVID GUSSET
With a number of online businesses selling discounted strings, many players are content with receiving their strings by mail and irresolute their own. Unfortunately, in then doing, the need to visit the violin store is besides discounted, at the cost of a missed opportunity to have the wellness of their instruments routinely examined by an expert (not just a instructor).
A good shop will check the instrument for open edges and developing cracks, and offer the player guidance on the proper position and angle of the bridge while likewise inspecting the bridge for warping. I ever bank check to run across that the fingerboard is non coming loose from the neck or if information technology needs resurfacing. I lubricate cord grooves with graphite, inspect the pegs for fit, and lubricate them with peg chemical compound. Still, learning the proper method for changing strings and beingness familiar with the correct position and angle of the span and how to adjust it is useful knowledge for whatsoever string player.
The musical instrument's span is held in place merely by the tension of the strings, and when properly fitted, the soundpost is only barely snug between the front and dorsum plates. How tightly the post fits betwixt the top and back plates can also vary seasonally, because forest of the violin trunk changes its dimensions with fluctuations in relative humidity. Removing all the strings and bridge tension at the same time could crusade a soundpost to topple over.
Leave the simultaneous removal of all four strings to the violin store to preserve the set-upwards, by measuring the exact position of the soundpost and the bridge beforehand. For the player changing his or her ain strings, it is best to remove and replace one string at a fourth dimension, so as not to disturb the position of the soundpost or bridge. Irresolute strings can exist done 1 later on another without the private string play-in.
I frequently start by installing and lightly tightening the new strings, but not immediately tuning them upwardly to pitch, then checking the angle of the bridge and tightening the strings some more. You should exist familiar with the proper angle of your span and frequently push the summit of the bridge back equally you continue to bring the strings upwards to pitch. Of grade, the bridge should be checked for angle every time the strings are tuned in the future and especially in the first few days of stretching in new strings.
The right bending of the span is achieved past having the back side of the bridge (the side facing the tailpiece) standing relatively perpendicular (90 degrees) to the table of the violin. This applies equally to a viola span and also to the lower portion of the back side of a cello bridge. A violin or viola bridge is finished apartment on the dorsum side and slightly chested or arched on the front side. A cello bridge is chested on the front side, simply must also be finished with some curvature from the upper border part mode down on the back, particularly on the A string side. Equally a rule, the gauge perpendicular positioning of the dorsum of the bridge gives the impression of the bridge leaning slightly back in relation to the belly, but allows the bridge wedge to exactly bisect the bending of the strings passing over the upper edge of the bridge.
After installation, most strings volition go on to stretch to some caste, especially during vigorous performance. Since 6/7 of the vibrating string length of an instrument is located to the front side of the span and one/vii of the string length is on the dorsum side, it is only natural that when strings are tightened using the pegs nearly of the slack is taken upwardly between the nut and the bridge thus pulling the upper edge of the span in the direction of the nut, causing it to lean or curve toward the fingerboard.
The feet of a properly cutting bridge are fitted to match the contours of their locations on the abdomen. Every bit the span begins to lean, the downward pressure level of the strings will compel the feet to stay in flat contact with the belly, thus causing the bridge to bend, which when left unchecked will create extreme stress on the waist (center) of the span and may eventually cause the bridge to warp or even intermission, requiring the costly bridge replacement. In the procedure of tuning the violin, the bridge must exist oft examined and adjusted for its proper angle.
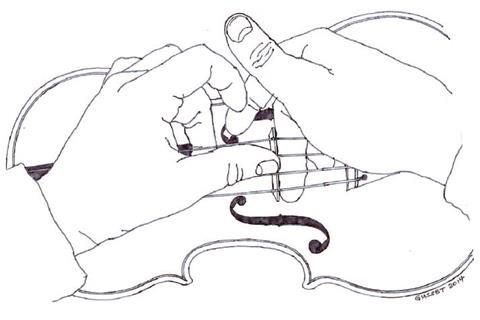
The safest manner to adjust the span without danger of pushing it over is performed in the following fashion. Sit down in a chair and place the instrument across your lap with the scroll to the left. The right alphabetize or middle finger should be extended nether all iv strings from the far side. The left paw is positioned comfortably around the strings to the front of the span with pollex at the centre of the crest of the bridge betwixt the centre two strings and the middle finger braced against the end of the fingerboard. With the right index or eye finger slightly lifting some of the tension of the strings off the span, the left thumb can gently push the upper edge of the bridge the required corporeality into the cushion of the right index finger. The finger doing the lifting will deed as a stop so that the bridge cannot actually be pushed over or too far (see analogy).
David Gusset is a luthier based in Eugene, Oregon
Start published in the The Strad's December 2014 effect
Source: https://www.thestrad.com/lutherie/ask-the-experts-how-to-correct-a-violin-bridge-position/515.article
0 Response to "How To Put The Bridge On A Violin"
Post a Comment